Food Items

iMenuPro Food items are the foods and beverages that you offer on your menus. If your business is a salon, spa, or other business that offers a menu of services, the services can go in this list also - items in the list don't specifically have be a food.
Each food item can include a Name, Description, Price (or multiple prices), and Extras. One or more of the these fields can be omitted from any food item.
On your menu, food items typically appear under Headings where the formatting can be controlled by options set by the Heading. This lets you have some sections of your menu in columns for example, while other sections are not.
Food List
When you initially start using iMenuPro, you'll want to add your food items into the Food list. The list serves as a database where your food items are always available, letting you choose from the list to create a new menu or modify an existing one.
Of course, you can add or edit your food items at any time - they do not have to all be entered at once.
Since your food items are stored in a list (or database) you'll need them to be there when you open a menu, so they should never be deleted unless you're sure that they will never appear on any menu. Additionally, changing a food item will result in a change on every menu that it appears on. This allows you to include the food item on several menus (dining room, carry-out, catering, specials, etc.) and only have to change the price or description one time - once it's changed the updated version will automatically appear on all menus that it's used on.
List view options
Food items are displayed in the list by their name, but if the name field for the item is not being used, the next relevant field is displayed (such as the item's description). If the food item is on the currently open menu, the green on menu will appear next to it.
You can sort the list by item Name (alphabetically), by Date added (old items appear on top, new items at the bottom), by Order on menu (items on menu appear on top, in order - any items not on the menu appear later alphabetically) or by Category/Note (sorts by Category with the Note field being a secondary sort, to categorize the items).
You can also view a short or long list, or a wide or thin list to match your viewing device.
Finding Food Items
You can scroll through your food list to locate an item to edit or add to your menu. But if your food list is large, you can filter your list to display just the items that match a specific key word or phrase. Just start typing a few letters into the Find Food Item box and iMenuPro will filter out any food items that don't contain the text that you've typed, leaving just the ones that match what you've typed.
Say you wanted to see all items in your list that contain the word Buffalo. Just enter buffalo into the Find Food Item box and you'll get a revised list that contains only the items that contain the word buffalo in either the name, description, or extras field of the item (note: the find box is not case-sensitive).
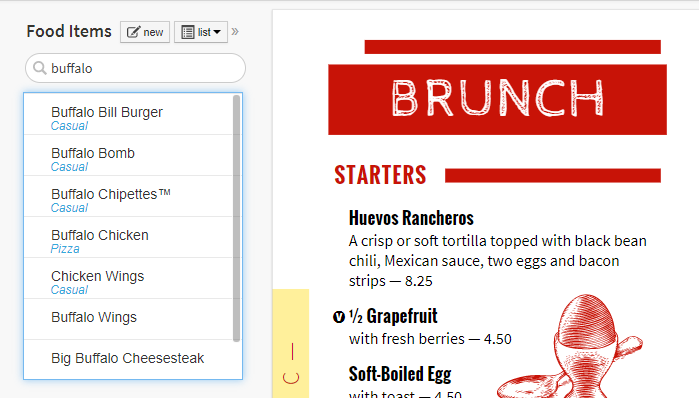
Finding food items that match a word or phrase
If you want to just search the name field, uncheck iMenuPro App settings > Include during find: Descritions/Extras
Once your filtered list reflects the matched items, you can then treat it like a regular list (edit, drag to menu, delete, etc.) or you can remove the filtering by simply removing any text from the Find Food Item box.
If you want to automatically remove the filtered list and clear the find box after any item edit, use list > Clear find after edit.
Tip! To quickly scroll through the list, hover your mouse over the list and use the scroll wheel (mouse wheel) on your mouse, or the up and down arrow keys on your keyboard. On touch devices just swipe the list.
Tip! The list is color coded to help you identify items that use only certain fields. If the item has no name, but has a description, it's displayed in blue. If it has no name and no description, but has a price, it's displayed in orange. If it has only extras, it's displayed in red. And if it has only the name (or name and price) then it's displayed in brown.
Adding New Foods
To add new items to the food items list click the New button at the top of the Food Items list, or use the Edit > New Food Item command.
Or right-click in the Food Items list and select New Food Item or Clone Food Item (clone creates a new item but prefills the text fields with text from selected item).
Cloning a Food Item
As mentioned, cloning a food item also adds a new item, but rather than starting out as blank, it copies the text from the original item - essentially you are creating a duplicate item but one that can be edited independently from the original. This can be useful if you have an item on two different menus but want different pricing for each. You can clone the item, and put the cloned item on another menu. When the cloned item's price is edited it won't affect the original item or original menu.
Since the cloned item and the original item will likely have the same item name, you can use the note field or category feature to tell them apart in the food list. See Categorizing Items for more info.
Food Item Fields
When you add or edit a food item, a Food Item box appears. The food item Name, Description, Price, Extras, and Note comprise the food item itself that is stored in the Food Items list. The other fields such Symbols, Bin/Numbers, Spacing, etc. control what appears next to the food item and how it's formatted on the menu. These fields are referred to as menu-specific since they are not technically saved in the list (database) but instead saved as part of each menu.
Tip! If you're copying data from another source, such as Excel or Word, you can use standard right-click copy and paste to copy text into the individual fields.
The following fields appear in the Food Item box:
Name
The food item's name. Most items have a name, but this field is not required.
Tip! If your food item is trademarked and you want the trademark symbol included, cut the ™ symbol from here (or any web text) and paste directly into a food item text field.
ID Premium Account Feature
A unique food ID, typically originating from your POS system or other external app, and used solely during import. This optional field does not appear on menus and must be unique to each item, i.e, it cannot be shared with another item. If present, and you import an item with same exact ID, the item's data fields will be updated rather than added as a new item.
Description
A description of the food item. The description follows the food item name on the menu. This field is not required.
Price
The price (or prices) of the food item. The price field is not required.
The placement of the price on the menu is determined by the Menu Style, but you can override any price placement using the Design > Price Options command or by using the Price with Name option for the food item (see below).
The price field can be any text including 12.95, market price, ask your server, etc. and does not need a currency symbol as that option is set by the Menu Style and can also be changed with the Design > Price Options command.
Additionally, you can include multiple prices for a food item (two prices or more, which will be spaced in columns) by adding a semi-colon between the prices. For example, say your food item is a pizza that has three sizes and prices. You can enter 12.95;14.95;16.95 and the 3 prices will be printed on the same line with the proper spacing between them so they line up from item to item.
You can adjust the spacing between multiple prices on the same line using the Design > Price Options command.
Moving the price position on the menu is a powerful tool for menu engineering, so it's good to experiment with the Design > Price Options command to see what works for your menu.
Extras
The extras field allows you to add something extra about the item that is set apart from the description on the menu in a different font or layout. It could be an add-on to the item, a wine pairing, additional toppings, or anything extra you want to add. Some examples are: Add a side for $6 or Half portion: $16 or Includes side of brown rice or Extra cheese $1.50. The extras field is not required.
Symbols
Symbol icons appear in front of the food item name and can be used to designate special items that you want to draw attention to. To use a symbol with the food item, click under Symbols and select a symbol from the list or choose none to remove the symbol. If you use both symbols, the symbol on the left will appear to the left on the menu.
The size and the color of the symbols are preset with the Menu Style but you can override these using the Design > Symbol Options command.
Symbol selections are menu-specific (can change from menu to menu).
Advanced Tip! If you need to push a symbol farther away from a food item because you're using a box accent, you can a) use the special spacer symbol (the last symbol in the symbol list) or b) add &nbps; in the Bin/Number field if it's not already in use.
Bin/Number
The Bin/Number field allows you to have numbers, letters, or underscore characters (___) in front of the food item on the menu. Its name is derived from a storage area in a wine cellar where wines were held before being sold. But it's useful for any menu that requires numbered food items, such as Carry-out menus, Sushi menus, Room service menus, etc.
The text entered in this field is automatically formatted as a 'hanging-indent' using the same font as the food item description.
The Bin/number is menu-specific (can change from menu to menu).
Box/Accent
Surrounds or highlights the food item with a box or accent. To add a box or accent simply select it from the list. You can also set the box or accent's color using the Box/Accent Color selector. If you set two or more adjoining foods on your menu to have the same box type and same exact box color, the boxes will join together to become a single box.
To remove a box or accent, select (none).
Boxes and accents are menu-specific (can change from menu to menu).
Item Photo (buttons)
Lets you upload a photo (or picture) from your computer or select one from your image collection to attach to the food item. Unlike floating images, which are added using the Insert > Uploaded Image command, a photo added here is automatically sized and remains next to the item.
You can upload new images by clicking the Upload Photo button or browse previously uploaded images in your image collection by clicking the Photo box. To remove the photo, click Remove.
Photos linked with food items are menu-specific (can change from menu to menu).
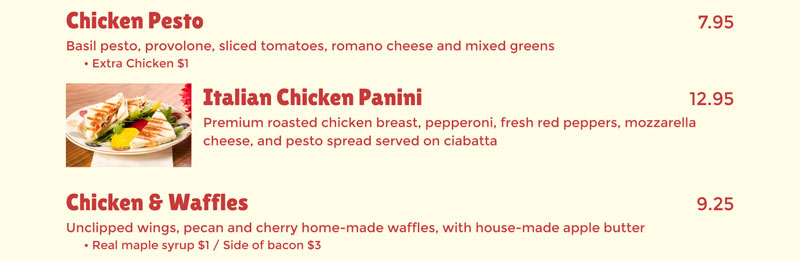
Food photo added to food item
Spacing (Before/After)
The spacing for food items is automatically set with your Menu Style. The actual values used by the Style are displayed in gray in the Before and After boxes. You can override the Style spacing for any food item by clicking Custom and then editing the spacing values. This lets you put more or less space before or after the item.
If you want to return to Style spacing, click the Style button.
Custom spacing is menu-specific (can change from menu to menu).
Tip! To add spacing to ALL food items and headings on the page at once, and in a uniform manner that retains the design aesthetics of the style, use the Page Spacing buttons on the toolbar.
Layout Tweaks - Center
Overrides the Menu Style layout and centers the food item on the menu (for Menu Styles that are already centered this option has no effect). This option is menu-specific (can change from menu to menu).
Layout Tweaks - Span
Overrides food columns (and menu columns if at the top or bottom of menu) to span across the columns. This option is menu-specific (can change from menu to menu).
Last item in group item spanning food columns
Layout Tweaks - Price with Name
Overrides the Menu Style price placement and positions the price next to food item name (for Menu Styles that are already using Price with Name this option has no effect). This option is menu-specific (can change from menu to menu).
Layout Tweaks - Wrap Text
Automatically formats line breaks for you. Normally you'll want to leave this box checked so when you switch Menu Styles (or add/remove text) the food items will be formatted properly. However, if you want to override this auto-formatting and enter the line breaks yourself, uncheck this box - the food item text fields will then appear on your menu exactly as entered. This option is menu-specific (can change from menu to menu).
On Menu
The On Menu checkbox can be used to place an item on the menu or remove it from the menu.
To place the item on the menu, check the box and click OK. The item will appear on the menu as the last item on the menu.
To remove the item from the menu, uncheck the box and then click Ok.
Delete
Delete will permanently remove the food item from the Food Items list and any menu that it appears on. This action cannot be undone, so proceed carefully when deleting a food item. To simply remove the item from the menu, use the On Menu button instead.
Category / Note (button)
Clicking the Category / Note button opens the food item's Note field which lets you enter dietary or other information about this particular item.
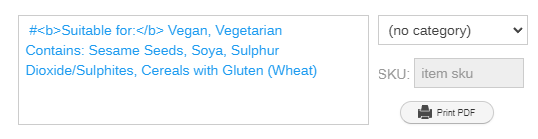
You can then display these notes on your QR or Live-Sync web menus if the note starts with the hashtag '#'.
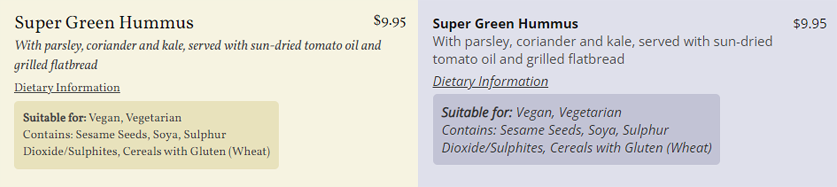
Examples of dietary notes on web menus
Or you can simply use this field to store key words that can be searched such as lunchspecial, or you can enter a recipe or any other relevant information about this food item that you want to keep private. The note field does not appear on printed menus, but can appear on live-sync or QR menus if it starts with a hashtag and if the Note label option in either the Live-Sync or QR Ultra is active.
You can also print to PDF the item and its dietary note or recipe here with the Print PDF button. 
-- Note formatting --
The note field is formatted to preserve all line breaks and even allows for simple html tags e.g. <b></b> (bold) <u></u> (underline) and also supports emojis 😀.
As mentioned, notes do not appear on printed menus but can appear in the food list by selecting list > Show Category/Note in the Food Items list. This will cause the first few words of the note to appear under the food name.
To hide the note field, click the Category / Note button again.
Category
Next to the note field you'll find the food's Category selector. If you've purchased the Category Labeler Add-on, then this selector will be populated with any categories you have added to the labeler. Selecting a category for this food item will allow you to display the label in the food list, along with the note, to help you better organize your item list. (Categories do NOT appear on menus - they are for organizational purposes only.)

SKU:
If you've assigned a category to the item, you can also add an SKU. The SKU is included in any raw food item data that is exported from iMenuPro as well, as long as a category is also assigned to the item.
Next» (button)
The Next>> button lets you add successive food items to your list without having to close the box for each new item. Just click Next when you're done editing if you want to add another new food item.
To Edit a Food Item
Click the food item in the Food Items list, or if the item is on the menu, click it on the menu. Or right-click the item in the Food Items list and select Edit.
To Place a Food Item on the Menu
Drag the item from the Food Items list and drop it on the menu. Or click the item in the Food Items list to edit and then check the On Menu box. Or right-click the item in the Food Items list and select Place on menu.
To Move a Food Item, or Reorder on the Menu
Click and hold the food item, directly on the menu, and drag it to a new spot. Or right-click the item on the menu and select Move Up or Move Down.
To Remove a Food Item from the Menu
Click the food item, on the menu or in the Food Items list, and uncheck the On Menu box. Or (if you're on a computer with a mouse) right-click the item and select Remove from menu or hover over the item with your mouse and click the X in the upper-right corner.
To Delete a Food Item from the list
Click the food item in the Food Items list to edit, and then click the trash can icon or Delete.